How to Measure & Calculate Flooring for Closets and Alcoves
Published: 1 Jun 2026
Are you planning to install new flooring? Do you have closets, alcoves, or odd-shaped areas in your room? Measuring these spaces correctly saves you money and avoids waste.
Many homeowners buy too little or too much flooring. The reason is simple — they forget to measure every corner, closet, and alcove properly. This guide will walk you through the entire process step by step.
By the end, you will know exactly how to calculate flooring for any room, no matter how complex the shape.
Why Accurate Measurement Matters
Buying the wrong amount of flooring is a costly mistake. If you buy too little, you may not find the same batch or color later. If you buy too much, you waste money.
Closets and alcoves are easy to overlook. A small closet can add 10–20 square feet to your total. An alcove behind a door can add another 5–10 square feet. These numbers add up fast.
Getting the measurement right the first time is always the best move.
What You Need Before You Start
Gather these tools before measuring:
- A measuring tape (at least 25 feet long)
- A pencil and notepad
- A calculator or a flooring calculator square feet tool
- Graph paper (optional but helpful for odd-shaped rooms)
- A smartphone app or online flooring calculator for odd-shaped rooms
Having these ready makes the process quick and accurate.
Step 1: Draw a Simple Floor Plan
Start by drawing a rough sketch of your room. You do not need to be an artist. A basic outline is enough.
Include these areas in your sketch:
- The main floor area
- All closets
- Alcoves or bump-outs
- Any recessed spaces or nooks
- Hallways that connect to the room
This sketch becomes your measuring floor plan. It helps you track every section of the floor.
Step 2: Break the Room Into Rectangles
Most rooms are not perfect squares. Closets, alcoves, and bay windows make rooms irregular. The easiest solution is to divide the room into smaller rectangles.
Here is how to do it:
- Look at your floor plan sketch.
- Identify where the room changes shape.
- Draw lines to divide those areas into separate rectangles.
- Label each rectangle (Section A, Section B, etc.).
For example, imagine an L-shaped room. You would split it into two rectangles — one for the long part and one for the short part. Each rectangle gets its own measurement.
This method works for any room shape. It is the foundation of using a flooring calculator for odd-shaped rooms.
Step 3: Measure Each Rectangle
Now measure each rectangle you identified. Use your measuring tape for this step.
Follow this process for each section:
- Measure the length of the section (in feet or inches).
- Measure the width of the section.
- Multiply length × width to get the area in square feet.
- Write the result in your notepad.
Example: Main room: 14 feet long × 12 feet wide = 168 square feet Closet: 5 feet long × 3 feet wide = 15 square feet Alcove: 4 feet long × 3 feet wide = 12 square feet
Step 4: Add Up All the Sections
Once you have the square footage of each section, add them all together.
Using the example above:
- Main room: 168 sq ft
- Closet: 15 sq ft
- Alcove: 12 sq ft
- Total: 195 square feet
This total is your base measurement. But you are not done yet.
Step 5: Add the Waste Factor
No installation is perfect. Flooring gets cut, trimmed, and sometimes damaged during installation. You always need extra material.
Here are the standard waste allowances:
| Room Type | Waste Factor to Add |
| Simple square rooms | 5% |
| Rooms with closets and alcoves | 10% |
| Diagonal installations | 15% |
| Very complex layouts | 15–20% |
For our example with closets and alcoves: 195 sq ft × 1.10 = 214.5 square feet
Always round up to the nearest whole number. So you would buy flooring for 215 square feet.
Step 6: Use a Flooring Calculator
You can also use an online flooring calculator square feet tool to double-check your work. These tools are free and easy to use.
Simply enter:
- Room length
- Room width
- Waste percentage
The calculator gives you the total square footage needed. This is especially helpful when you are dealing with multiple rooms or complex shapes.
Many tools also show you how to calculate how many boxes of laminate flooring you need. Just enter the square footage per box (usually printed on the box), and the calculator does the math.
How to Measure a Closet
Closets are simple to measure. They are usually rectangular. But many people forget to measure them at all.
Steps to measure a closet:
- Open the closet door fully.
- Measure the depth of the closet (from the back wall to the door opening).
- Measure the width of the closet.
- Multiply the two numbers.
Example: Closet depth: 24 inches = 2 feet Closet width: 48 inches = 4 feet Closet area: 2 × 4 = 8 square feet
Add this to your main room total. Even small closets count.
Do you have a walk-in closet? Treat it like a separate room. Measure and add it just like any other rectangle.
How to Measure an Alcove
An alcove is a small recessed area in a wall. It could be a reading nook, a built-in shelf space, or a bump-out near a window.
Steps to measure an alcove:
- Measure the width of the alcove opening.
- Measure the depth (how far it goes into the wall).
- Multiply width × depth.
Example: Alcove width: 3 feet Alcove depth: 2 feet Alcove area: 3 × 2 = 6 square feet
Add this to your total square footage.
Laminate Flooring: How Many Boxes Do You Need?
If you are installing laminate flooring, you need to figure out how many boxes to buy.
Here is how to calculate how many boxes of laminate flooring you need:
- Find the square footage per box. It is printed on the box label. A typical box covers 20–25 square feet.
- Divide your total square footage by the coverage per box.
- Round up to the nearest whole box.
Example: Total square footage needed: 215 sq ft. Coverage per box: 22 sq ft. 215 ÷ 22 = 9.77 boxes → Round up to 10 boxes
Always buy one extra box. You may need it for repairs later. Laminate flooring batches change over time, and you may not find the same color again.
Vinyl Flooring: A Slightly Different Calculation
Vinyl flooring often comes in rolls or large sheets. This changes how you calculate.
For vinyl flooring rolls:
- Vinyl rolls are usually 6 or 12 feet wide.
- You buy it by the linear foot (length of the roll).
- Measure the longest dimension of your room.
- Add extra for seams and waste.
For vinyl planks (luxury vinyl tile/LVT):
- These come in boxes, just like laminate flooring.
- Use the same box calculation method above.
- Vinyl planks are popular because they are waterproof and easy to install in kitchens and bathrooms.
Tip: For rooms with closets and alcoves, vinyl planks are easier to work with. You can cut them precisely for small sections without much waste.
What About Mezzanine Floors?
A mezzanine floor is an intermediate level between the main floors of a building. It is common in open-plan homes, loft apartments, and commercial spaces.
To calculate flooring for a mezzanine floor:
- Measure the mezzanine as a separate floor area.
- Draw its own floor plan sketch.
- Break it into rectangles (same method as above).
- Calculate the total square footage.
- Add a 10–15% waste factor for the edges and railings.
Important note: Mezzanine floors often have unusual shapes. They may be circular, curved, or angled. For these shapes, use an online flooring calculator for odd-shaped rooms. Some tools let you trace the exact shape and calculate the area automatically.
Also, keep in mind that mezzanine floors often need reinforced or lightweight materials. Check the load capacity of your structure before choosing thick flooring like stone or hardwood.
Tips for Oddly Shaped Rooms
Some rooms have angles, curves, or multiple recesses. These are harder to measure. Here are some practical tips:
Use the grid method: Draw the room on graph paper. Each square on the paper equals one square foot. Count all the full squares. Estimate the partial squares near the edges. Add them up.
Use a digital floor plan app: Apps like MagicPlan or RoomScan let you measure a room with your phone camera. They create a digital measuring floor plan automatically. Then you can export the measurements.
Divide L-shapes, T-shapes, and U-shapes: Any unusual shape can be broken into two or three rectangles. Measure each rectangle separately and add the totals.
Round up always: When in doubt, always round up your measurements. An extra box of flooring is much cheaper than running short mid-installation.
Common Mistakes to Avoid
Many homeowners make these mistakes. Avoid them to save time and money.
Forgetting closets: Always include every closet, even small coat closets. They all need flooring.
Skipping alcoves: Small alcoves near doors or windows are easy to miss. Walk around your entire room before measuring.
Not adding waste: Never buy the exact square footage you measure. Always add 10% for closets and alcoves.
Using the wrong unit: Measure everything in the same unit. Do not mix feet and inches. Convert everything to feet before calculating.
Buying from a different batch: If you order flooring in two separate orders, the color may not match exactly. Always buy all your flooring at once.
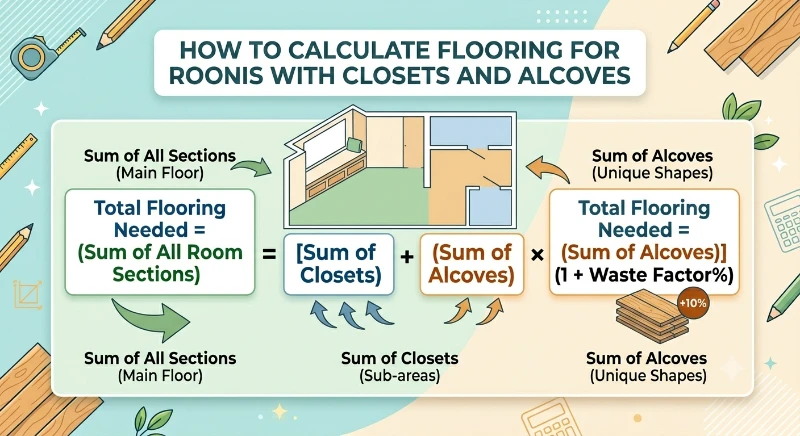
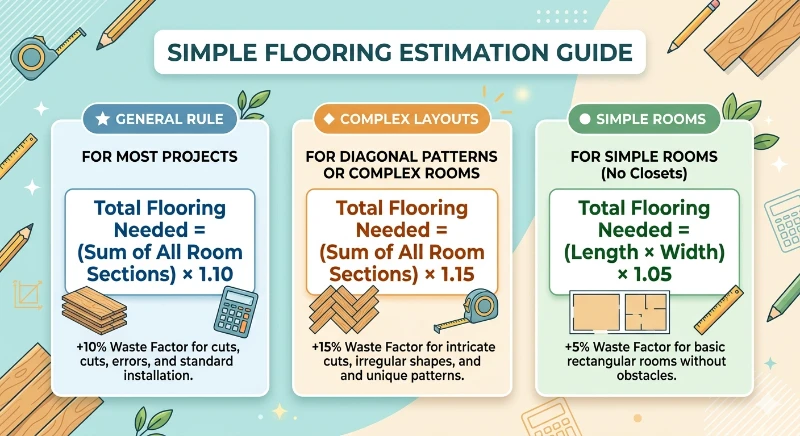
Quick Reference: Flooring Calculation Formula
Here is the simple formula to remember:
Total Flooring Needed = (Sum of All Room Sections) × 1.10
For rooms with diagonal patterns or very complex layouts:
Total Flooring Needed = (Sum of All Room Sections) × 1.15
For simple rooms without closets:
Total Flooring Needed = (Length × Width) × 1.05
Example: Full Room Calculation
Let’s put it all together with a real example.
Room layout:
- Main bedroom: 15 ft × 13 ft = 195 sq ft
- Walk-in closet: 6 ft × 5 ft = 30 sq ft
- Alcove (window seat area): 4 ft × 2.5 ft = 10 sq ft
- Small linen closet: 3 ft × 2 ft = 6 sq ft
Total base area: 195 + 30 + 10 + 6 = 241 square feet
Add 10% waste: 241 × 1.10 = 265.1 → Round up to 266 square feet
Laminate flooring boxes (22 sq ft per box): 266 ÷ 22 = 12.09 → Buy 13 boxes
Simple, right? This method works every time.
Final Thoughts
Calculating flooring for rooms with closets and alcoves is not difficult. You just need to be thorough and organized. Measure every section. Break the room into rectangles. Add a waste factor. Then use a flooring calculator to confirm your numbers.
Whether you are installing laminate flooring, vinyl flooring, or hardwood, the calculation process is the same. Take your time with the measuring floor plan. Double-check every number.
Good flooring installation starts with good measurements. And good measurements start with this process.
Now grab your measuring tape and get started. Your perfect floor is just a few calculations away.


- Be Respectful
- Stay Relevant
- Stay Positive
- True Feedback
- Encourage Discussion
- Avoid Spamming
- No Fake News
- Don't Copy-Paste
- No Personal Attacks
- Be Respectful
- Stay Relevant
- Stay Positive
- True Feedback
- Encourage Discussion
- Avoid Spamming
- No Fake News
- Don't Copy-Paste
- No Personal Attacks
